Autozoom plugin
Naostage has developed a GrandMA3 plugin to automatically control the zoom of a moving head so that the beam size will be constant on a moving stage marker. The beam size is defined as the diameter (in meters) of the light pool on the target.
Prerequisites
Before using the AutoZoom plugin, you must first configure your console for tracking by following the followspot application tutorial. This ensures that your fixtures, markers, and tracking system are properly set up.
Download
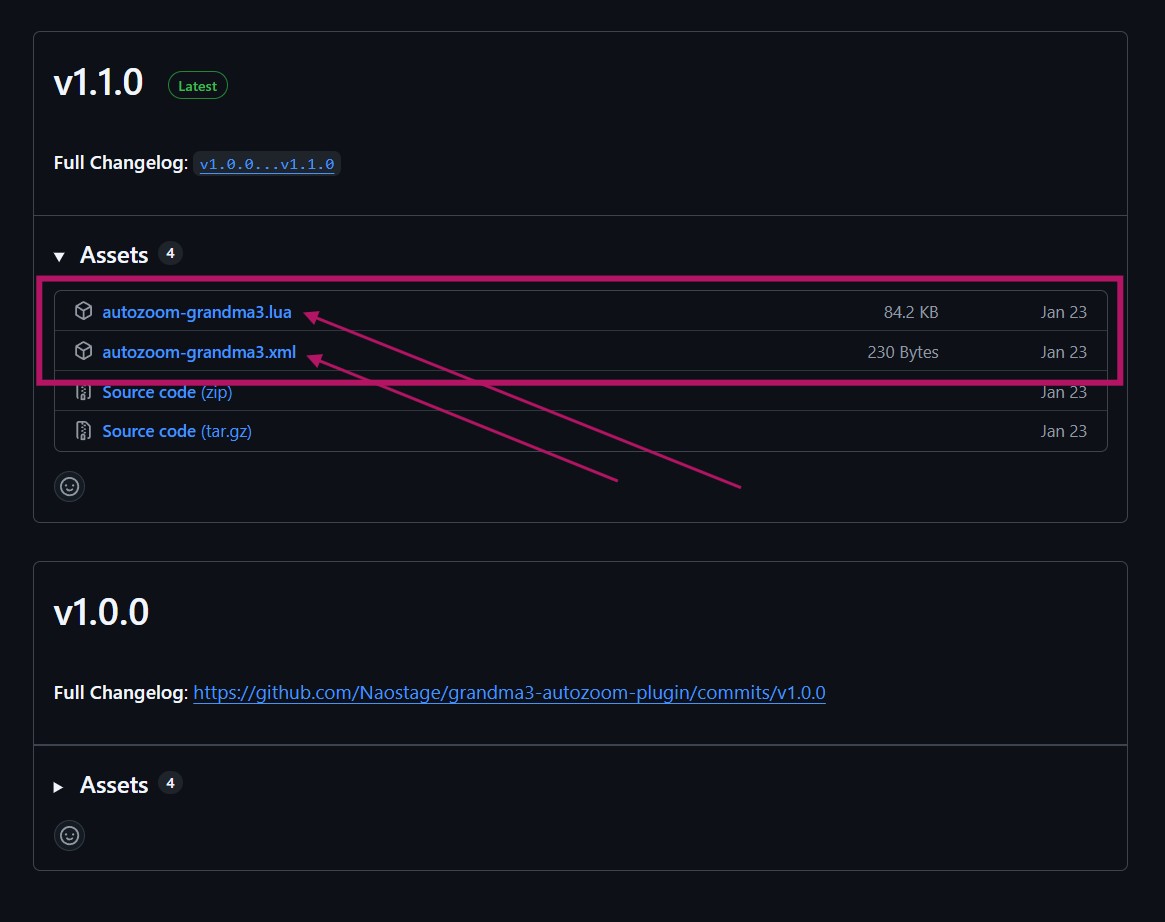
Go to the latest release of the autozoom plugin and download both files:
autozoom-grandma3.luaautozoom-grandma3.xml
Installation
Once downloaded, put both files (autozoom-grandma3.lua and autozoom-grandma3.xml) in the plugin directories of your station or USB stick.
- Windows:
C:/ProgramData/MALightingTechnology/gma3_library/datapools/plugins - MacOS:
/Users/[User Name]/MALightingTechnology/gma3_library/datapools/plugins - USB Stick:
[Drive Letter]:/grandMA3/gma3_library/datapools/plugins
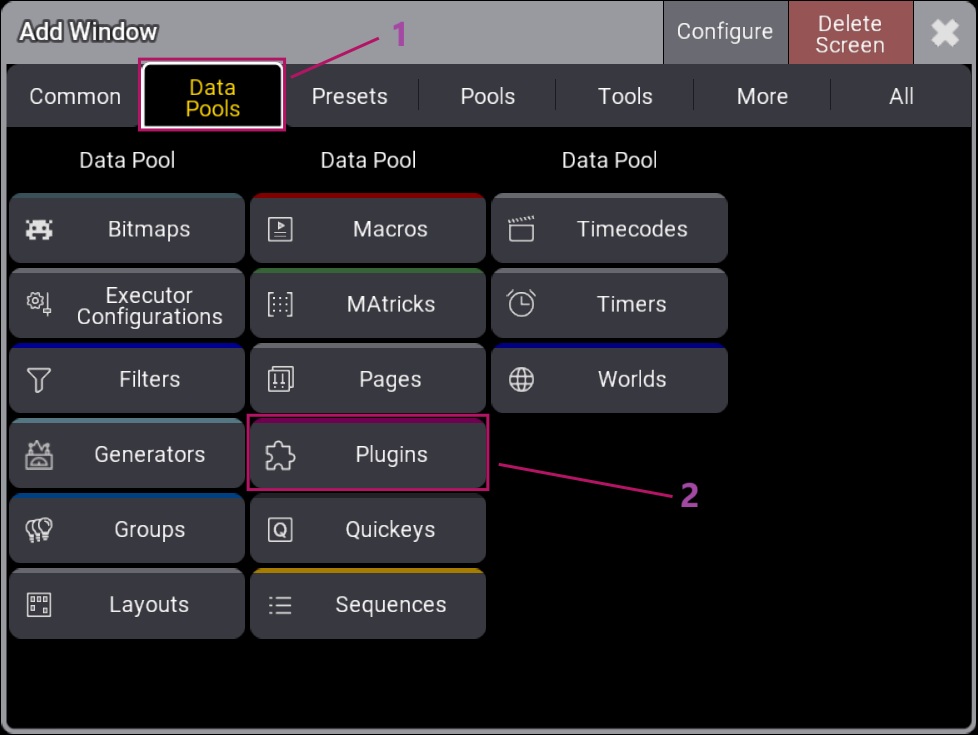
Load the plugin in your show file, then open the plugin pool (Add Window -> Data Pools -> Plugins).
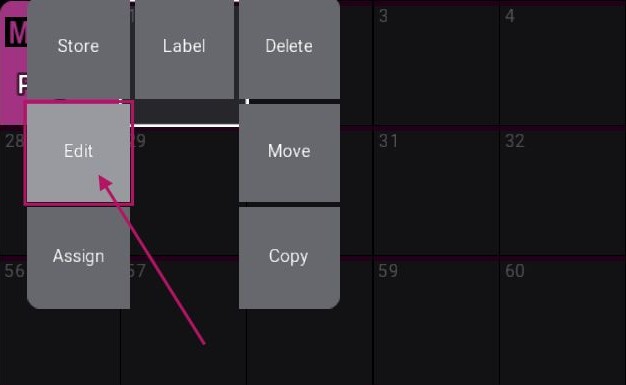
Finger swipe on the desired plugin pool slot to open the options, then select Edit Plugin.
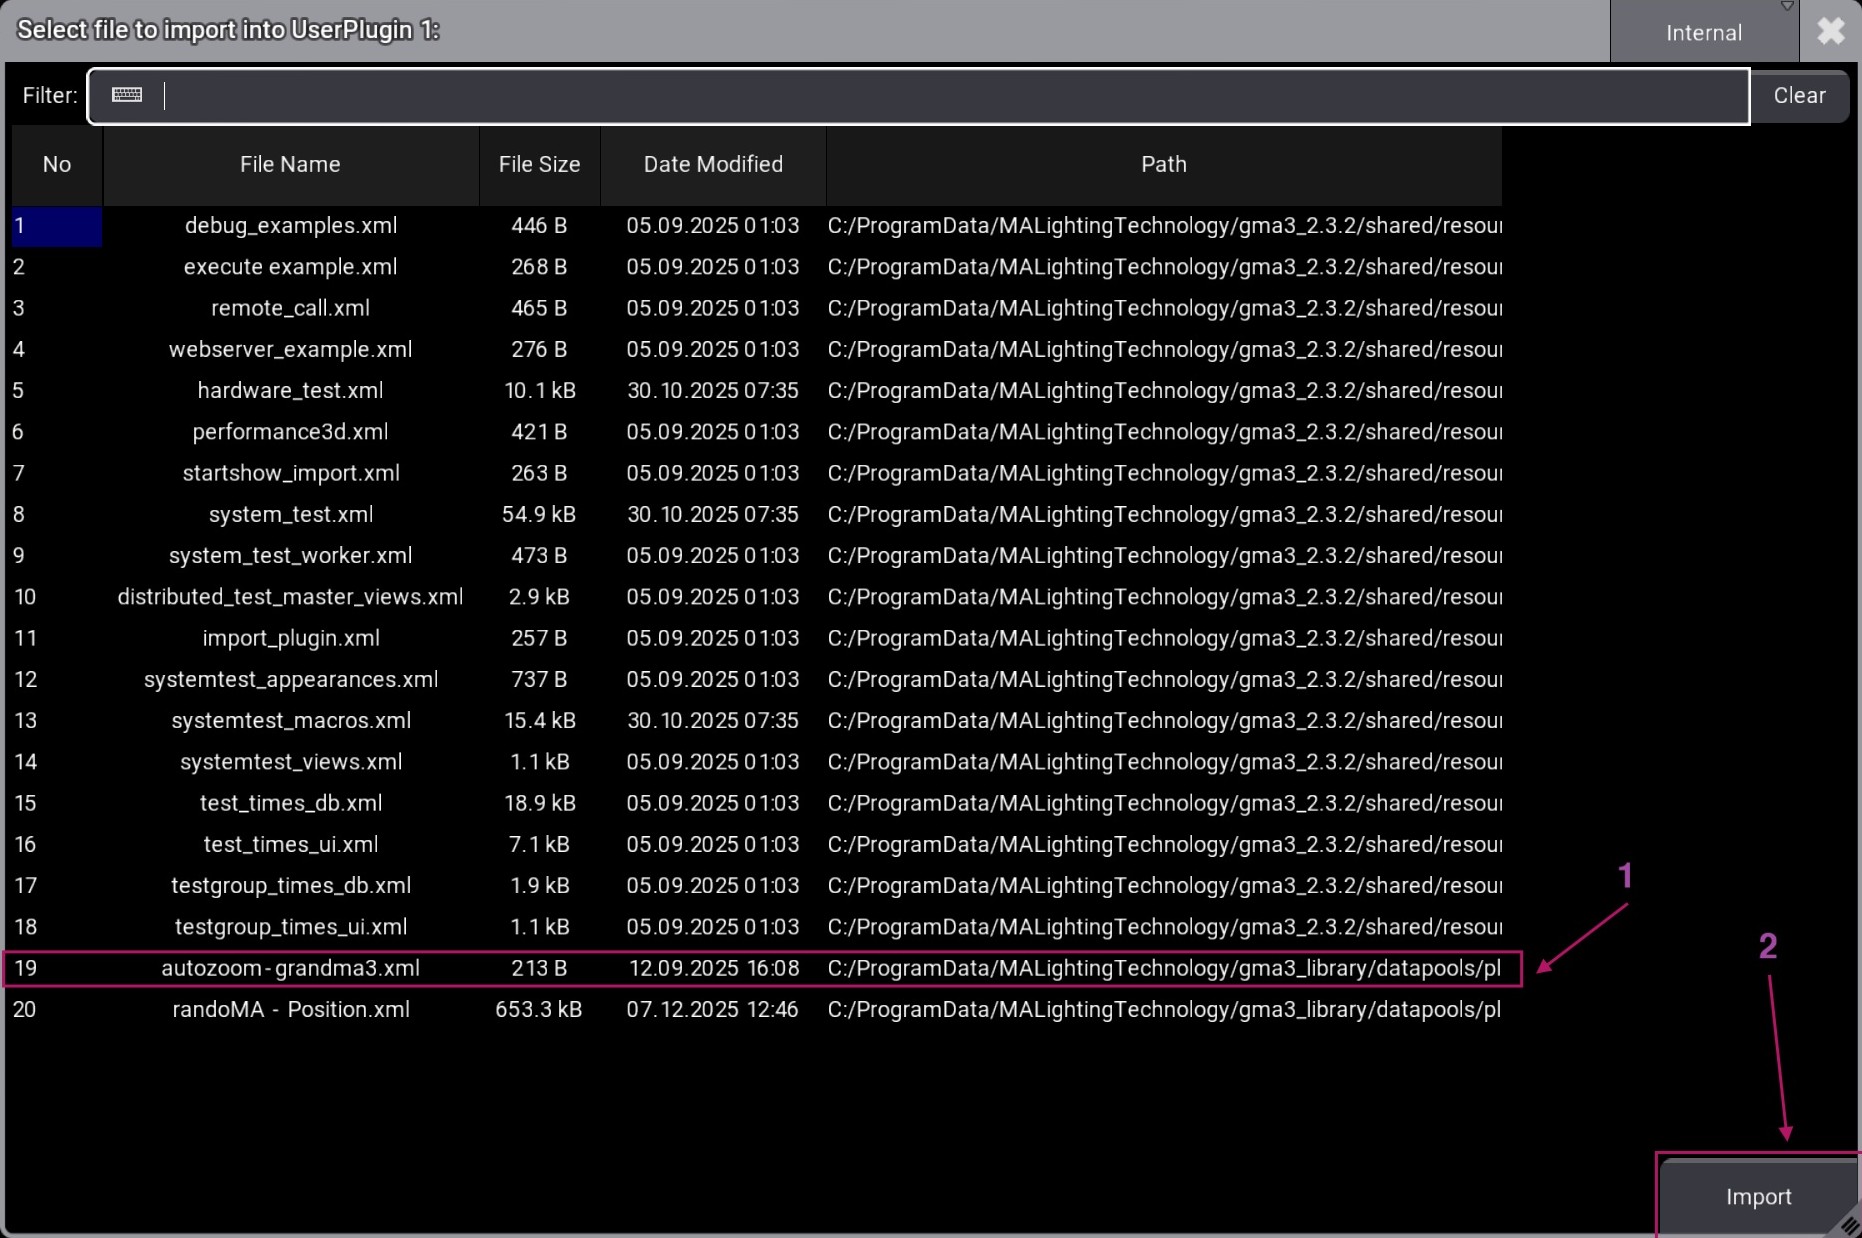
The "Edit Plugin" window appears. Click Import. If you don't see your file, use the directory selector at the top right to switch to the correct folder.

In the "Import Plugins" window, change the drive source in the top left corner if your file is on a USB stick.
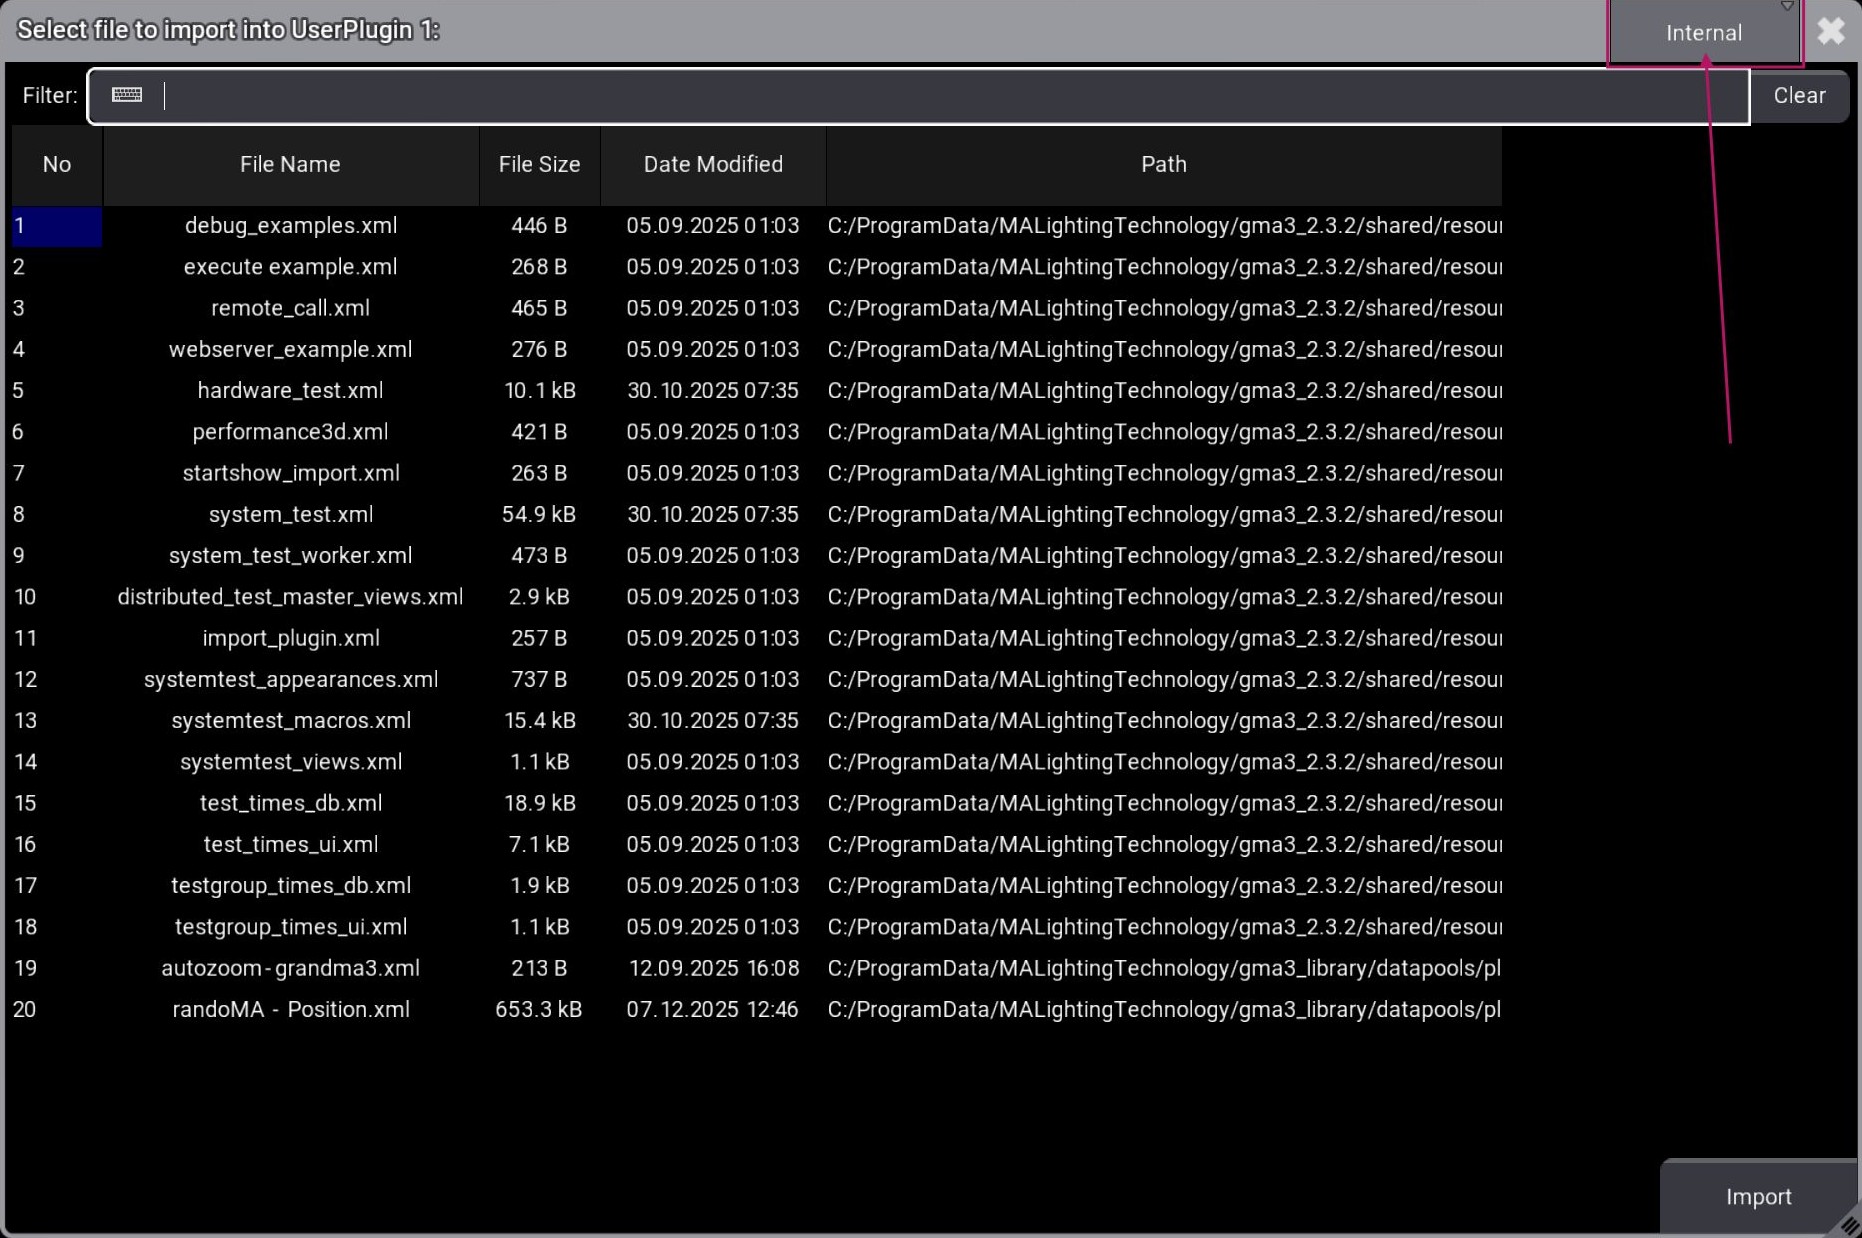
Select autozoom-grandma3.xml and press Import.
After importing, click the plugin in the pool to start it, and you should see this in the command line. These lines confirm the plugin has started successfully and provide information about the fixtures detected in the patch.

For more details on handling plugins, refer to the official grandMA3 plugin documentation.
Create the macros
To create all macros for plugin control, type Lua "AZ:CreateMacros(<index>)"
Enter this command in the command line, replacing <index> with the macro pool number where you want the first macro to start.

Multiple macros will be created at the specified index.

Macros Explanation
Some macros are global and ready to use for controlling the AutoZoom plugin.
| Macro | Description |
|---|---|
AZ ENABLE |
Enables the AutoZoom plugin. |
AZ DISABLE |
Disables the AutoZoom plugin. |
AZ SHOW ENABLE |
Displays the current status of the AutoZoom plugin (Enabled / Disabled). |
AZ RESCAN PATCH |
Rescans the patch for XYZ-enabled fixtures and markers. |
AZ PRINT PATCH |
Displays the scanned patch in the command line. |
AZ GET FIXTURE STATUS |
Prints current fixture status (which fixture follows which marker). |
AZ DISABLE ALL FIXTURE |
Disables AutoZoom for all enabled fixtures. |
AZ ENABLE GLOBAL SIZE FADER |
Enables the global fader to control all fixtures' beam size simultaneously. |
AZ DISABLE GLOBAL SIZE FADER |
Disables the global fader; each fixture reverts to its individual beam size. |
AZ SET SIZE FADER RANGE |
Sets the min/max beam size range for faders. |
AZ ENABLE DATAPOOL |
Enables the separate "AZ" datapool. |
AZ DISABLE DATAPOOL |
Disables the "AZ" datapool. |
The following examples macros are designed to be duplicated and customized for each fixture. These example macros (listed in the table below) contain placeholder parameters that you must edit to match your specific fixture and marker configuration.
You may duplicate these macros and modify the values inside them according to your setup, then execute the customized version in your show.
For information: fid = fixture id, mid = marker id. Replace fid and mid with the actual fixture and marker id numbers you want to use.
| Macro | Description | Example Command |
|---|---|---|
AZ EXAMPLE ENABLE FIXTURE |
Enables AutoZoom for a fixture, marker and beam size | Lua "AZ:EnableFixture(<fid>,<mid>,<beam_size>)" |
AZ EXAMPLE DISABLE FIXTURE |
Disables AutoZoom for a specific fixture | Lua "AZ:DisableFixture(<fid>)" |
AZ EXAMPLE ENABLE SIZE FADER |
Enables the size fader for a fixture | Lua "AZ:EnableSizeFader(<fid>)" |
AZ EXAMPLE DISABLE SIZE FADER |
Disables the size fader, returns to fixed beam size | Lua "AZ:DisableSizeFader(<fid>)" |
AZ EXAMPLE CREATE AZ SEQUENCES FOR FIXTURE |
Creates sequences for a fixture | Lua "AZ:CreateAZSequences(<fid>)" |
Usage
Prepare fixture
You must ensure that the zoom and iris physical values are correctly set for each fixture you want to use with AutoZoom. The plugin uses these physical values to calculate the correct beam angle based on the distance between the fixture and marker. Incorrect values will result in the beam being too wide or too narrow.
The zoom must reflect the actual angle specified by the manufacturer (5° → 50°).
If the fixture's zoom behaves inversely (wide beam when it should be narrow), reverse the physical values as follows:
From Phys = value max
To Phys = value min
If you need to use Iris to create a smaller beam when zoom is not enough, perform the same checks for the Iris values.


Setup Stage Marker, PSN and fixture
See the followspot application tutorial for setting up markers, PSN, and fixture calibration.
Reading the patch
When the plugin starts, it automatically scans the patch to see where the fixtures are in 3D space, and their Zoom/Iris physical ranges.
If you change fixture positions or physical ranges, rescan using AZ RESCAN PATCH.

Enabling AutoZoom on a fixture
First Step - Enable the Plugin
Before using any other macros, you must first activate the AutoZoom plugin by calling the macro AZ ENABLE. Once enabled, activate each fixture with the macro AZ EXAMPLE ENABLE FIXTURE (see the macro table for required arguments).
Create Zoom and Iris Sequences
If you have followed the followspot application tutorial, you must have a tracking sequence stored on your console with a fixture's position linked to a marker.
In this same tracking sequence cue, store the zoom and iris values at their minimum.
To create the required sequences AZ_ZOOM_<fixture_id> and AZ_IRIS_<fixture_id> with zoom and iris set to their maximum values, launch the macro AZ EXAMPLE CREATE AZ SEQUENCES FOR FIXTURE and specify the fixture ID to automatically generate these sequences.
You may enter this argument in the AZ_EXAMPLE_CREATE_AZ_SEQUENCES_FOR_FIXTURE macro:

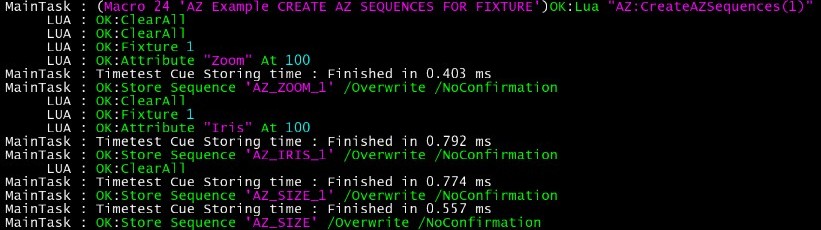
This creates multiple sequences in your sequence pool:

Note on using automatic sequence creation
When you use the automatic sequence creation, the sequences will be created in one of two locations:
- In a dedicated "AZ" datapool (if enabled with
AZ ENABLE DATAPOOL) - In your current active datapool (default behavior if AZ datapool is disabled)
DataPools
You may enable/disable the use of the separate "AZ" Datapool using the macros AZ ENABLE DATAPOOL or AZ DISABLE DATAPOOL (by default: Disabled).
When DataPool is enabled:

When DataPool is disabled:

Important Notes
- Automatic sequence creation only works on fixtures that are already enabled and have AutoZoom active.
- Future updates will also automatically create the tracking sequence, with XYZ at 0, Zoom and Iris at minimum, and marker set.
Disabling a fixture
To disable AutoZoom on a fixture, edit and call macro: AZ EXAMPLE DISABLE FIXTURE: change the (fixture_id) parameter.
To disable all fixtures at once, use AZ DISABLE ALL FIXTURE.
Using a fader for Beam Size
Faders can control beam size. Options:
- Use one for each fixture (e.g.
AZ_SIZE_<fid>, where<fid>is your fixture ID) - Use one global fader for all fixtures (
AZ_SIZE)
Enable Size Fader for Individual Fixture
Edit AZ EXAMPLE ENABLE SIZE FADER with your fixture_id and run it.

Disable Size Fader for Individual Fixture
Edit AZ EXAMPLE DISABLE SIZE FADER with your fixture_id and run it.

Enable Global Size Fader
Run AZ ENABLE GLOBAL SIZE FADER.

Disable Global Size Fader
Run AZ DISABLE GLOBAL SIZE FADER.

Set Size Fader Range
Faders remap 0-100 to a beam size range in meters. Edit AZ SET SIZE FADER RANGE with min/max values (e.g., min=1, max=5 for 1m-5m range).

Get the current status
Run AZ GET FIXTURE STATUS to print which fixtures are following which markers and their beam sizes.
