Calibrate with Free Calibration
Free Calibration is a point-based way to calibrate the cameras of a Kapta or Kam. You place reference points at known positions in your venue, mark where each one appears in the camera image, and Kratos works out the camera's position and orientation in the Kratos coordinate system.
Unlike the legacy calibration, you are not limited to a single floor rectangle. You can mix rectangle patterns and individual points placed anywhere you know the position of: marks on the floor, riser corners, truss feet, set pieces.
Free Calibration only computes the camera's position and orientation.
The lens parameters of the camera (focal length, optical center and distortion) are not changed.
Open the Free Calibration page
In the Show Explorer Cameras tab:
- select a camera and click Free Calibration in its panel to open the page on that camera, or
- select a device and click Calibrate. This opens Free Calibration only when the Free Calibration preview is turned on. When it is off, Calibrate opens the legacy calibration window.
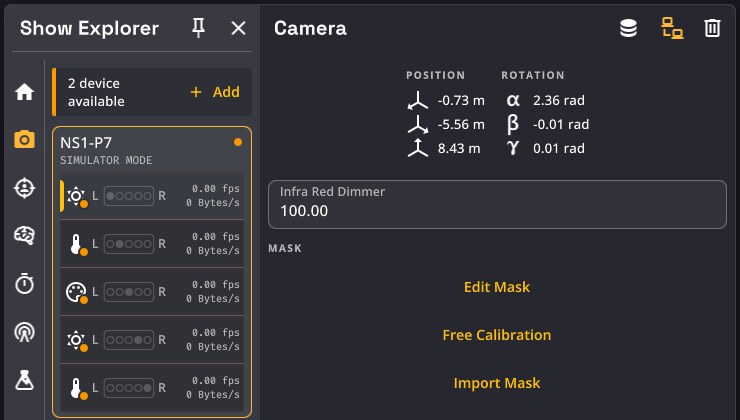
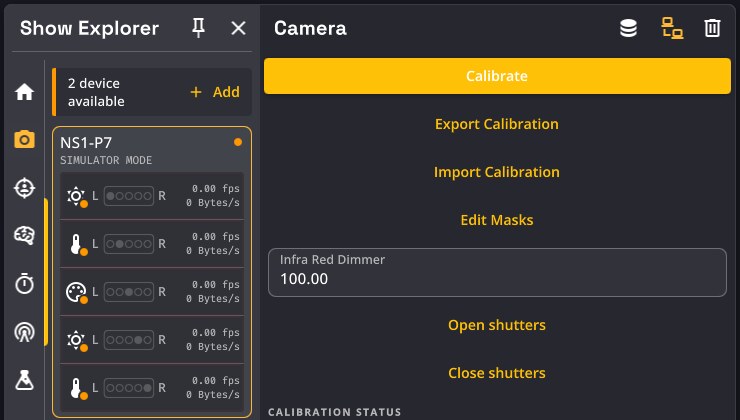
The page opens full screen and has two steps, shown in the stepper at the top center:
- Set up points: describe where your reference points are in 3D.
- Calibrate cameras: mark those points on each camera image.
Click a step in the stepper to move between them. You can go back and forth at any time. The highlighted button at the top right also takes you forward: it reads Calibrate cameras in step 1, and Save N camera(s) in step 2.
The header shows the show name and, in orange, how many cameras have unsaved changes.
Screen layout
The page is organized in side panels (rails):
- The Points rail is always on the right, at the same place in both steps. It is the list of reference points you work through during the whole calibration.
- The Cameras rail is on the left, in step 2 only.
- The center of the page shows the 3D stage (step 1), or the camera image and a 3D view side by side (step 2).
Each rail has a chevron button in its header to hide it. A hidden rail leaves a slim tab on its edge with its name. Click the tab to bring it back. Drag the inner edge of a rail to make it wider or narrower. Kratos remembers the size and state of the rails.
Set up points
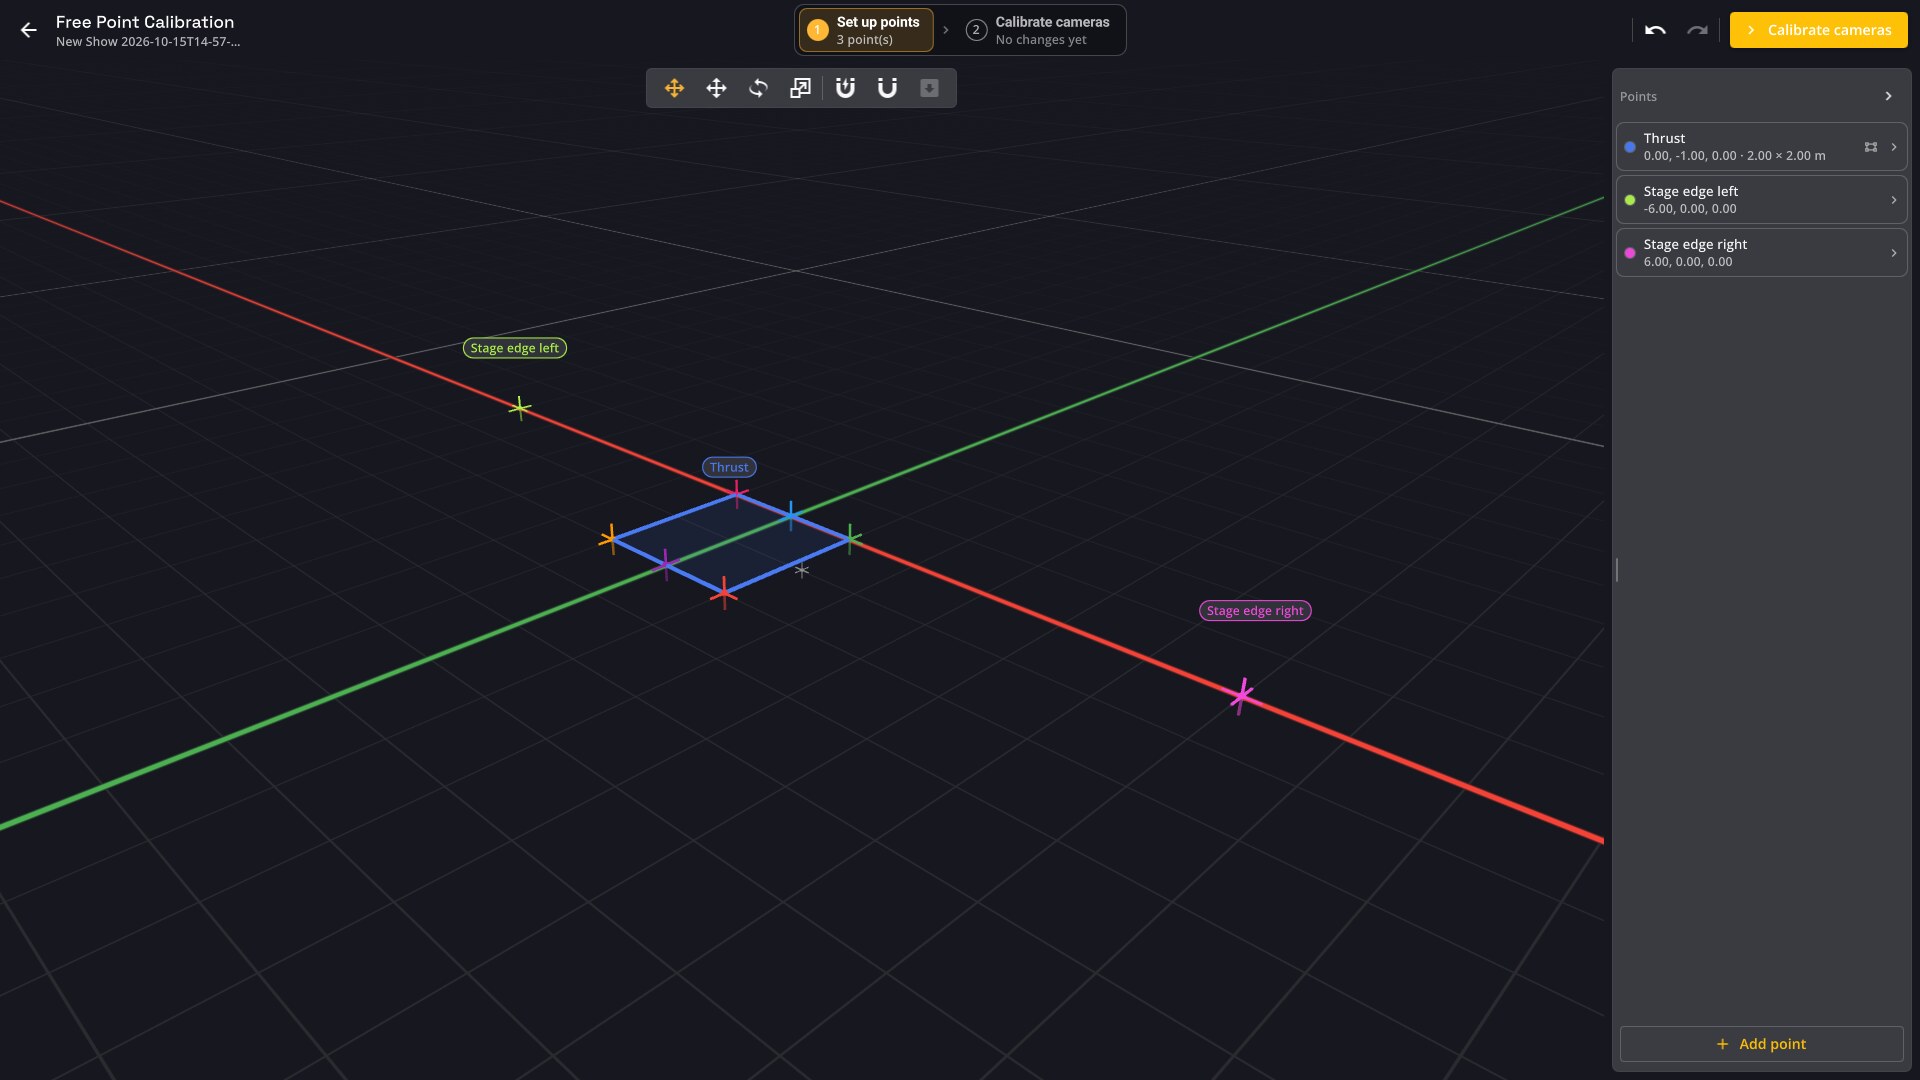
In this step you create the reference points and tell Kratos where they are in the real world. These are the same points as in the Stage Editor's Calibration Patterns tab: they are saved in the show and shared by every camera.
Add a point
Click Add point at the bottom of the Points rail, choose a type and click Add:
| Type | Description |
|---|---|
| Rectangle Pattern | A 6-point pattern (3×2 grid) placed on a flat surface. Recommended for most setups. Works best on flat floors with a clear line of sight. |
| Free Point | A single point placed anywhere in your space: on a riser, a wall, or any reference position. Add as many as you need. |
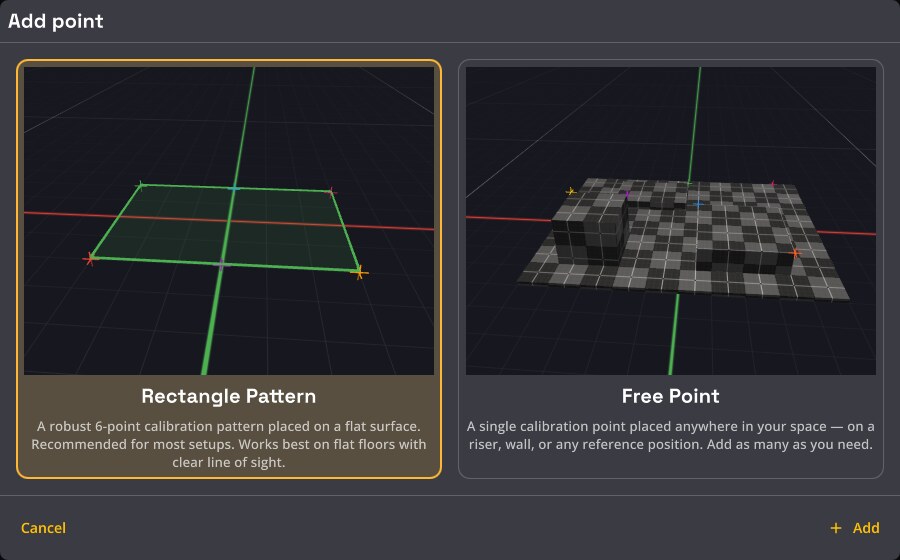
The new point is selected and appears in the 3D stage. If the show has a floor mesh, it is dropped onto the floor.
When the show has no points yet, the Add point window opens automatically.
Edit a point
The Points rail is a list of cards. A collapsed card shows the point's color, name and position. For a rectangle pattern it also shows its size, for example 0.00, -1.00, 0.00 · 2.00 × 2.00 m.
Click a card to open it and show its settings. Opening a card closes the others. Click it again to fold it.
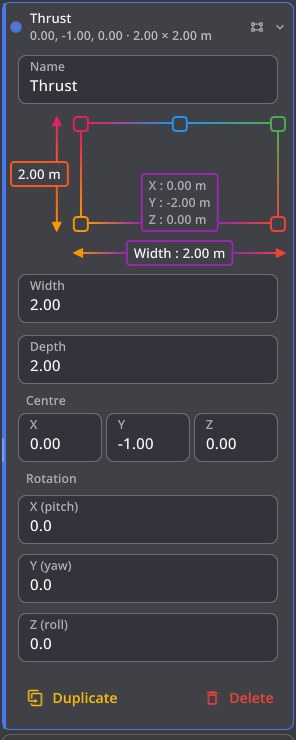
| Setting | Description |
|---|---|
| Name | The point's name, also shown on the camera image. |
| Width / Depth | Rectangle pattern only: size of the pattern in meters. The diagram above the fields shows the 6 corners with the color each one uses on the camera image. |
| Position (free point) / Centre (rectangle) | World position in meters. |
| Rotation | Rectangle pattern only: X (pitch), Y (yaw), Z (roll) in degrees. |
Duplicate and Delete at the bottom of the card copy or remove the point. Use Undo if you delete a point by mistake.
You can also click a point in the 3D stage to select it.
Move points in 3D
A floating toolbar at the top of the 3D stage controls the transform gizmo of the selected point:

| Button | Description |
|---|---|
| All modes / Translate / Rotate / Scale | Choose which handles the gizmo shows. Scaling a rectangle pattern changes its width and depth. |
| Snap | Move in fixed steps. |
| Snap to floor mesh | Keep the point on the floor mesh while you drag it. |
| Drop to floor mesh | Drop the selected point onto the floor mesh. Available when the show has a floor mesh enabled. |
Measure your points carefully.
The calibration can only be as accurate as the positions you enter here. A point that is 10 cm off in the real world will pull the camera's position off as well.
Spread your points out.
Use points that cover as much of each camera's view as possible, at different depths. Points bunched in one corner of the image give an unstable result.
Calibrate cameras
Click Calibrate cameras to go to step 2.
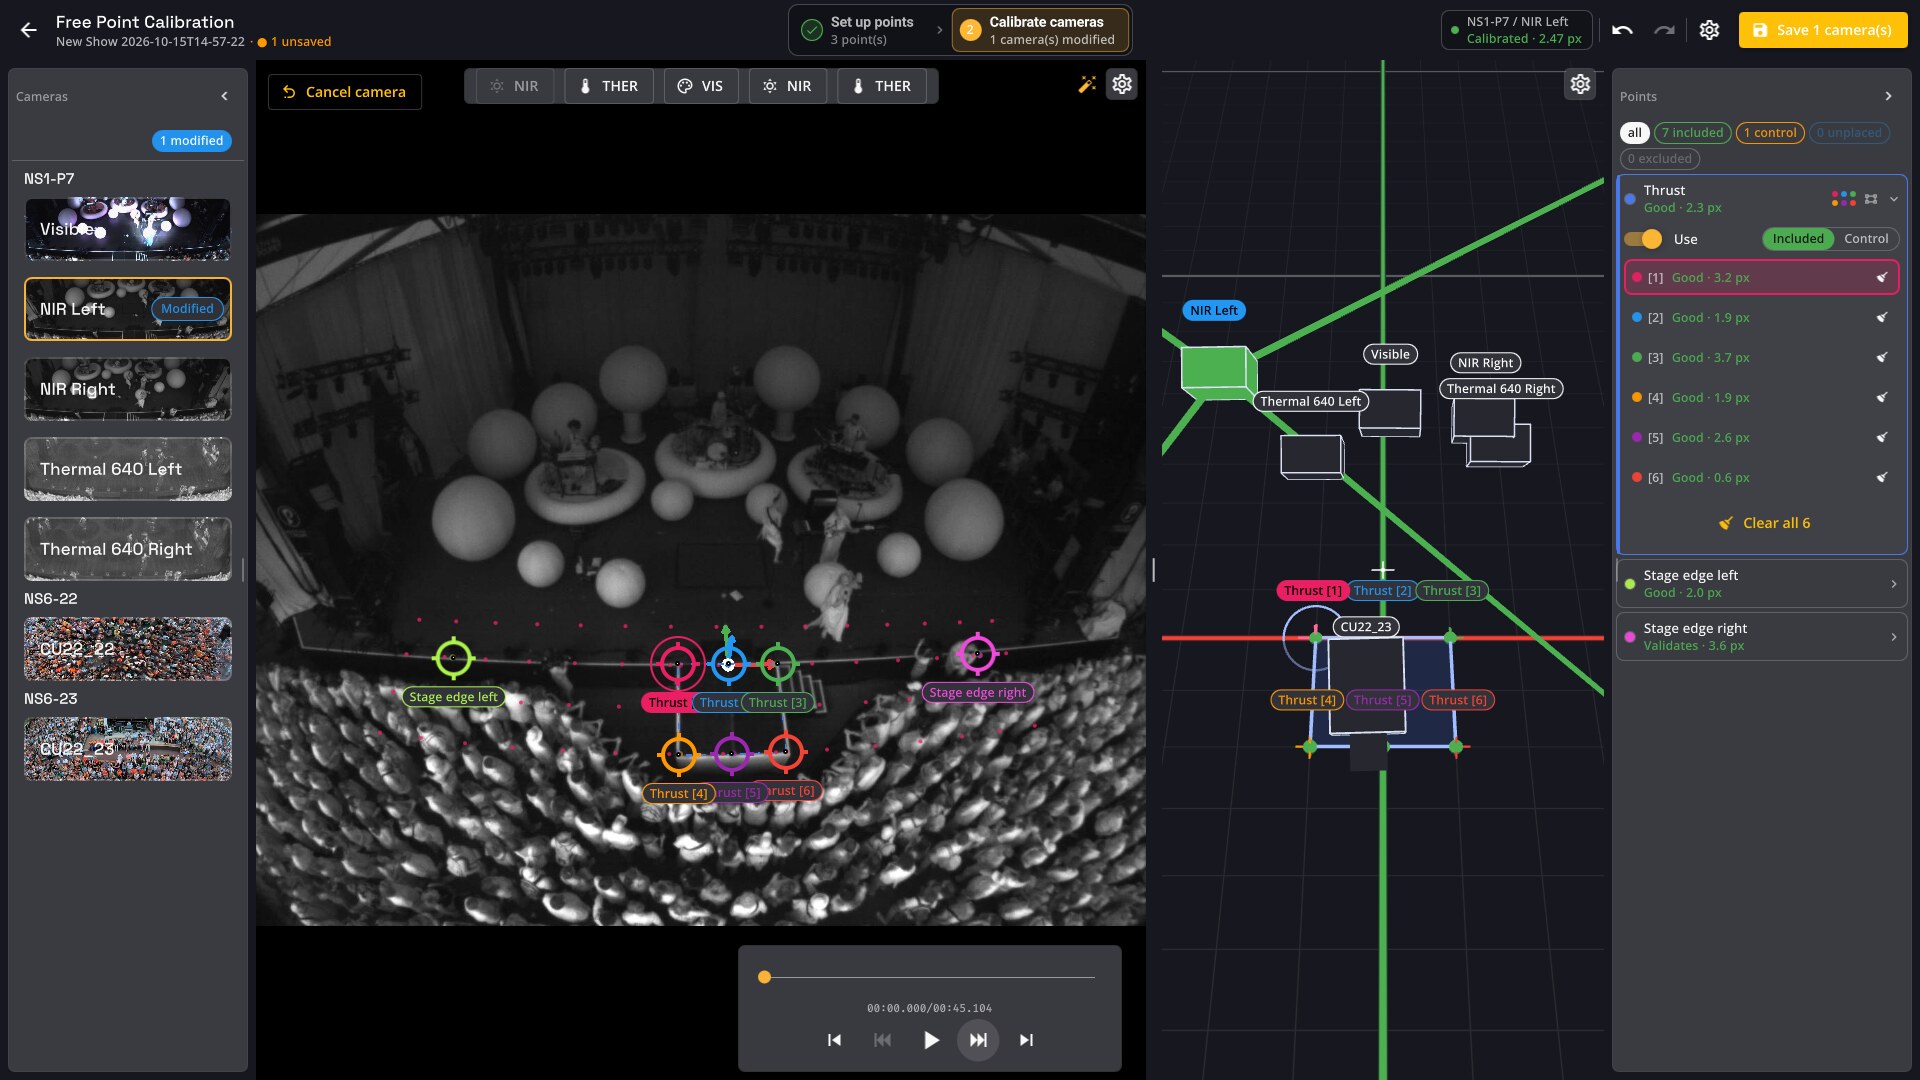
Choose a camera
- The Cameras rail on the left lists every camera, grouped by device, with a live thumbnail. Click a camera to calibrate it. Cameras with unsaved changes show a Modified badge, and a chip at the top of the rail counts them.
- For a device with several cameras (Kapta), a bar at the top of the camera image switches quickly between the device's cameras (NIR, THER, VIS).
The camera image
The center of the page shows the selected camera's image on the left and a 3D view on the right. Drag the handle between them to resize them. Use the mouse wheel (or pinch on a touchscreen) to zoom into the image, and drag an empty part of the image to pan.
If the camera sends no image, the view shows No Signal.
Over the camera image:
- Cancel camera (top left) undoes this camera's unsaved changes after confirmation (Keep / Discard). The camera goes back to its last save, or to how it was when you opened the page. It is disabled when the camera has no changes.
- The magic wand (top right) reuses another camera's calibration. See Reuse a calibration on other cameras.
- The View options cog (top right) shows or hides:
- Grid: the floor grid projected with the current calibration.
- Origin: the X/Y/Z axes of the Kratos origin. They fade out when your cursor gets close, so they don't hide the points you are placing.
- Floor: for points that are above the floor, a line from the point down to the floor (Z = 0). Off by default.
The 3D view shows your points and the cameras. The selected camera and the halos of its points are colored by status. Its cog has two settings:
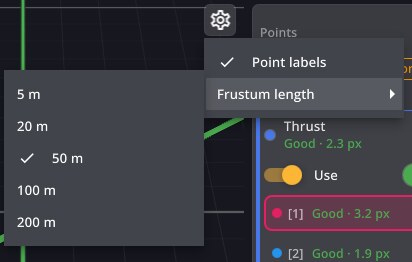
- Point labels: show or hide the point names.
- Frustum length: length of the camera's field of view drawn in the 3D view: 5, 20, 50 (default), 100 or 200 m.
Place points on the image
- Select a point in the Points rail. For a rectangle pattern, select one of its corners [1] to [6].
- Right-click the camera image where the point is. The point's marker appears there.
- Repeat for every point visible in this camera.
The calibration is recomputed every time you place or move a point. There is no "solve" button.
To refine a point:
- Left-click a marker to select it.
- Drag a marker to move it.
- Right-click elsewhere to move the selected point straight to that spot.
On a touchscreen, select a point in the list and tap the image to place it. Drag a placed marker to move it.
Each corner of a rectangle pattern has its own color. A dashed outline joins the placed corners so you can check the shape against the real one.
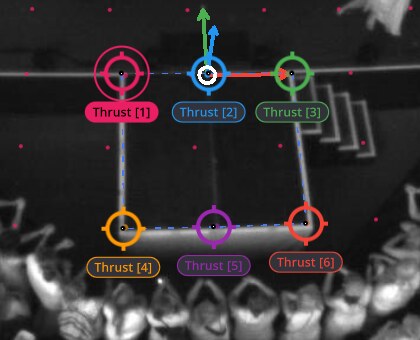
Zoom in for accuracy.
One pixel on the image can be several centimeters on stage. Zoom in on the image and use the magnifier and the arrow keys for the final adjustment.
Magnifier
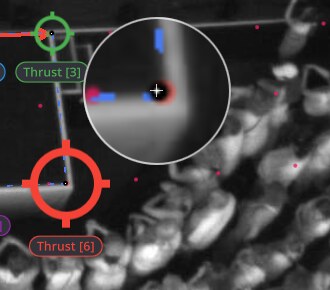
When you hover or drag a marker, a round magnifier appears just above and to the right of it. It shows the image and the markers 4× larger, with a crosshair on the exact pixel, so you can line the marker up with the real mark on stage.
Nudge with the arrow keys
Use the arrow keys to move the selected marker by 1 image pixel, or 10 pixels with Shift. If your cursor is over a marker, the arrows select and move that marker.
Each nudge is a separate step you can undo. The arrow keys don't nudge while you are typing in a text field.
Undo and redo
Use the Undo / Redo buttons at the top right of the page, next to the status, or Ctrl+Z and Ctrl+Y (or Ctrl+Shift+Z).
- In Calibrate cameras, undo and redo apply to what you did on the current camera: placing, dragging, nudging, clearing points and reusing calibrations.
- In Set up points, undo and redo apply to the point edits.
The Points rail in step 2
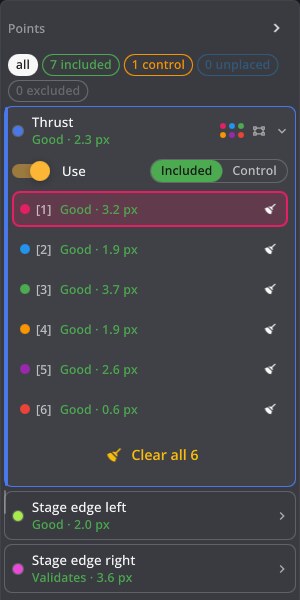
In step 2, the Points rail shows how each point is used by the current camera.
Filter chips
The chips at the top of the list count the points in each state. A rectangle pattern counts as 6 points. Click a chip to show only those points, or all to show everything again.
| Chip | Meaning |
|---|---|
| all | Show every point. |
| included | Placed on this camera and used to compute the calibration. |
| control | Placed on this camera and used only to check the result (see below). |
| unplaced | Not placed on this camera yet. |
| excluded | Turned off for this camera. |
Point cards
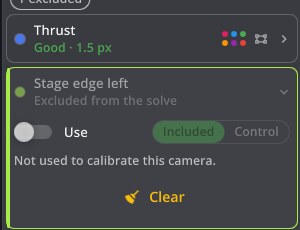
Each card shows a summary under the point's name: its error and quality (for example Good · 1.5 px, see Read the result), Not placed, or Excluded from the solve. A rectangle pattern also shows a small 3×2 grid of dots with the corners already placed, and n of 6 placed while it is incomplete.
Open a card to change how the point is used on this camera:
- Use: turn the point on or off for this camera, for example when it is hidden behind something. A point that is not used is dimmed on the image and can't be dragged.
- Included / Control: Included points compute the calibration. Control points are only used to check it.
- For a rectangle pattern, one row per corner. Click a row to select the corner. The button at the end of the row clears the corner, or places it at its reprojected position if it is not placed.
- Clear (or Clear all 6) removes the placement. When the point is not placed and the camera is already calibrated, Place at reprojection (or Place missing) puts it where the calibration expects it.
Points placed at reprojection start unused.
Place at reprojection only gives you a starting position. Check the marker on the image, then turn Use on and drag it onto the real mark. Right-clicking the image to place a point also turns it on.
Keep one or two Control points.
A Control point is not used to compute the calibration, so its error is an honest check of the result. If your Included points are all Good but a Control point is Off, something is wrong: a mis-measured point or a marker on the wrong mark.
Camera controls
A floating bar at the bottom of the camera image lets you adjust the image without leaving the page:
| Control | Description |
|---|---|
| IR Dimmer | Intensity of the Kapta's IR floodlights (0–100). Only shown when the current camera is infrared. |
| Gain | Camera gain (0–100). |
| Exposure (ms) | Exposure time. Read-only while Auto is on. |
| Auto | Automatic exposure. Turning it off restores the exposure the camera last used. See Auto Exposure. |
| HDR | Hardware HDR, when the camera supports it. |
Controls the current camera doesn't support are hidden. When the device is playing back a recording, the bar shows the playback controls instead.
Make the marks easy to see.
Raise the exposure or the IR dimmer while you place points so the marks on stage are clearly visible. Set them back for the show afterwards.
Reuse a calibration on other cameras
The cameras of a Kapta are mounted in the same housing, and Kratos knows how they sit relative to each other (the rig). Once one camera is calibrated, the magic wand on the camera image can move the other cameras with it:
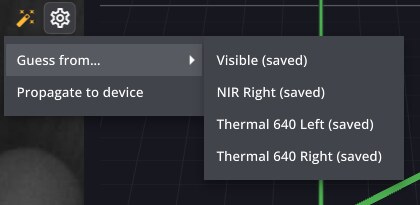
- Guess from…: pick another camera of the same device that is already calibrated (cameras calibrated in an earlier session are marked (saved)). The current camera takes its pose from that camera and the rig.
- Propagate to device: from the current camera (it must be calibrated), do the same for all the other cameras of the device.
Each camera that receives the calibration also gets your points, placed where the rig pose expects them, all unused. Its status reads From the rig · turn points to use to refine. A summary tells you how many points were brought over, and which ones were skipped, for example because they are outside a camera's view or behind it.
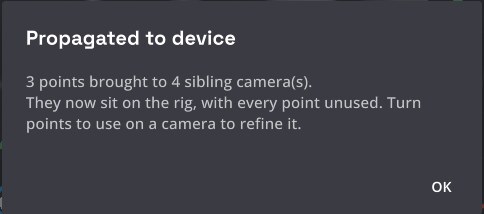
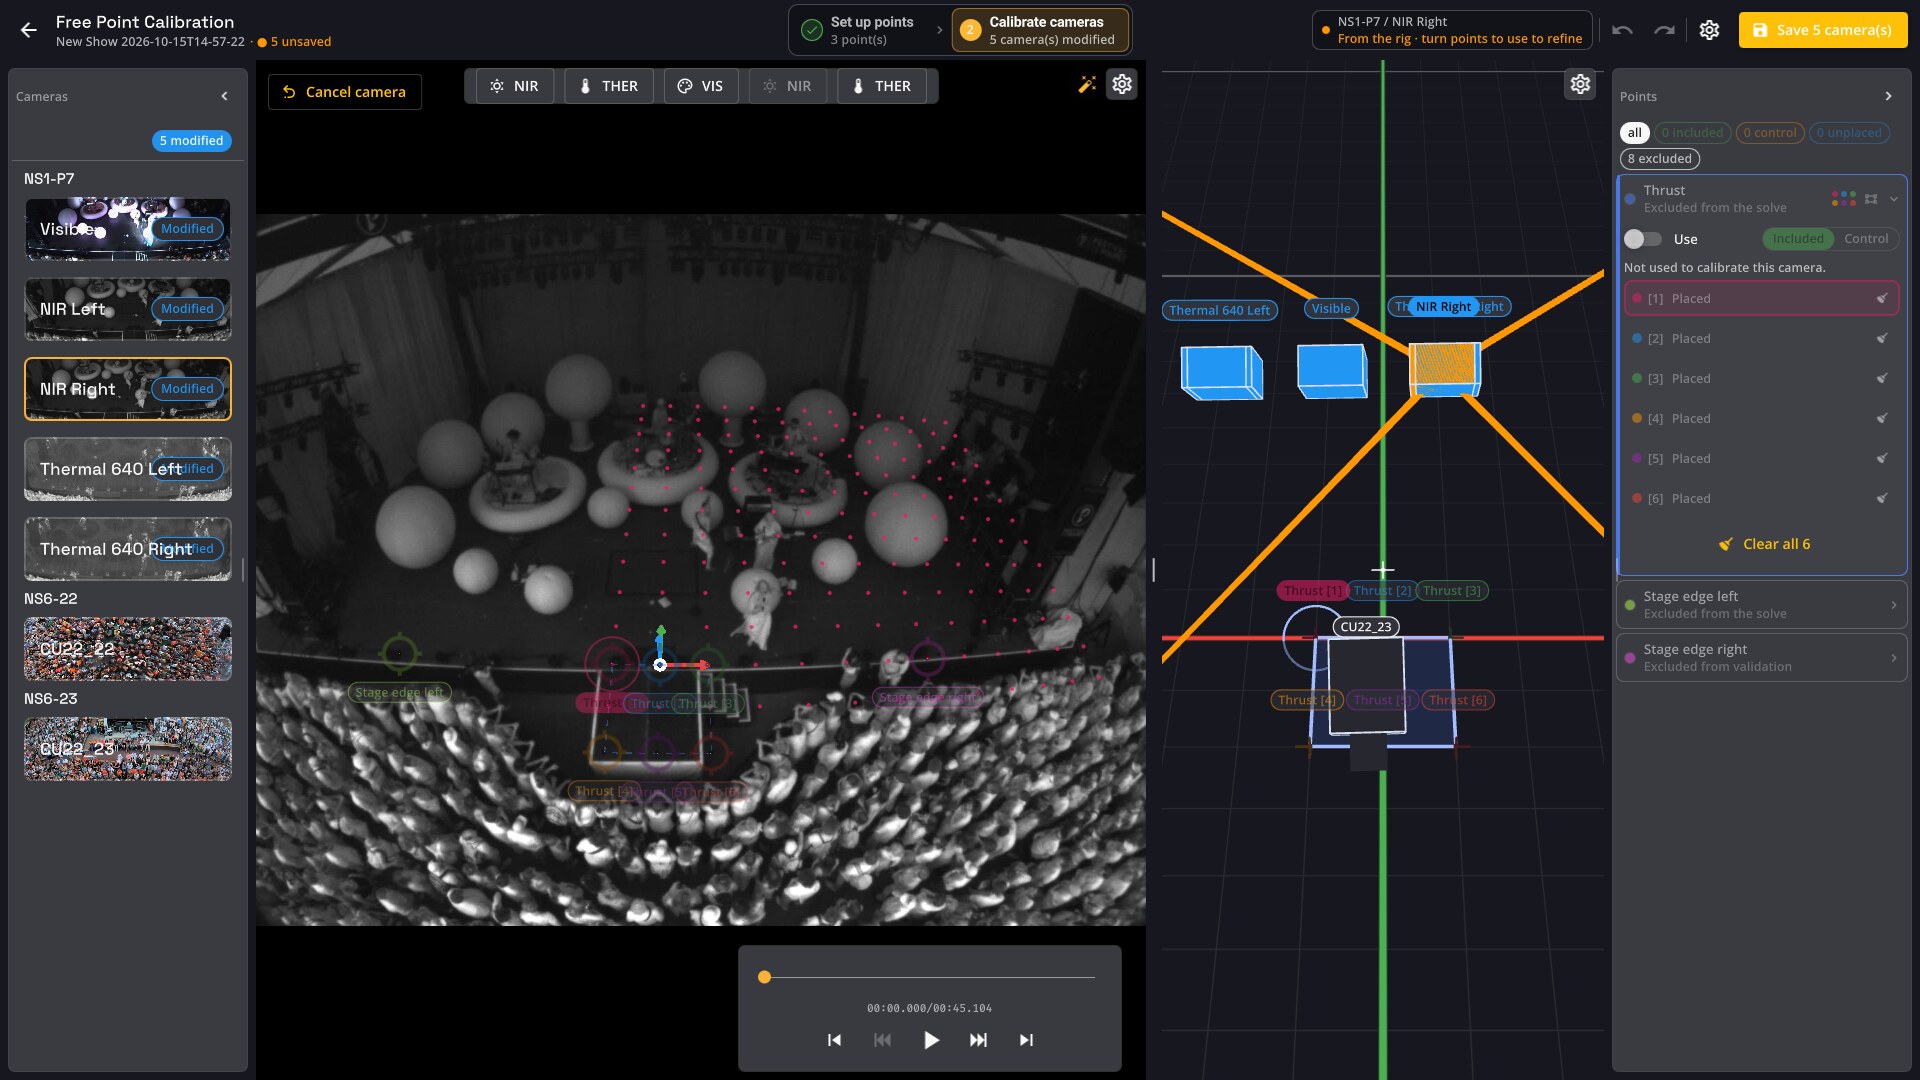
To refine a camera that came from the rig, check each point on its image: right-click the real mark to re-place the point (this turns it on), or turn Use on and drag it. As soon as 3 points are used, the camera is solved from its own image again.
The wand is disabled until a camera of the device is calibrated. It is not available for a single-camera device such as a Kam.
Rig poses are estimates.
The rig pose is close, but not as accurate as a camera calibrated from its own image. Check and turn on the points of every camera before you rely on it.
If another camera already has hand-placed points, Propagate to device asks for confirmation first: it replaces them with estimated positions. For cameras saved in an earlier session, this can't be undone.
Read the result
Overall status
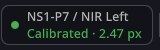
In step 2, the status of the current camera is shown at the top right of the page, next to the device and camera name:

| Status | Meaning |
|---|---|
| Calibrated · X px | The calibration is valid. X is the average error of the Included points, in image pixels. |
| Drift · X px / Misaligned · X px | The calibration is valid but its average error is high (orange or red). Check your points. |
| Calibrated (3 points) | Valid but unstable: only 3 points are used. Add at least one more. |
| From the rig · turn points to use to refine | The camera got its pose from another camera of the device. See Reuse a calibration on other cameras. |
| Not enough points | Fewer than 3 Included points are placed. |
| Calibration failed | No solution could be found with the current points. Check for a point placed on the wrong mark. |
| Stored pose | The camera shows the calibration it had before (after Cancel camera). Move a point to solve again. |
| Not calibrated | Nothing computed yet. |
Hover the status for more details, such as how many points are still needed.
You need at least 3 Included points; 6 or more, well spread, are recommended.
Per-point error
Once the camera is calibrated, Kratos projects each point back onto the image using the calibration. A small dot shows where the calibration expects the point. The error is the distance in pixels between that dot and your marker.
The card of each point shows its error with a quality word:
| Error | Included point | Control point |
|---|---|---|
| less than 5 px | Good | Validates |
| 5 to 15 px | Drift | Drift |
| 15 px or more | Misaligned | Off |
The same colors (green, orange, red) are used for the halos in the 3D view.
One bad point?
If one point is Misaligned while the others are Good, it is usually a marker on the wrong mark or a wrong world position. Move the marker, check the point's position in step 1, or turn it off.
Advanced settings
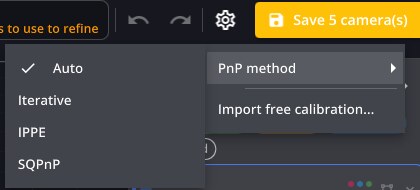
The Advanced cog at the top right of the page (step 2) contains:
- PnP method: the method used to compute the calibration. Auto (default) picks the most suitable one for your points. Iterative, IPPE (best for flat patterns like the rectangle) and SQPnP are available if Auto doesn't give a good result.
- Import free calibration...: see Import a saved session.
Save
Click Save N camera(s) at the top right of the page. It is disabled when there is nothing to save.
The Save calibration changes window lists every modified camera, grouped by device, with its result:
- Good · 2.5 px (or Drift, Misaligned): the camera's error, measured on the points you checked.
- Good · 2.5 px · 3/6 checked: some of its points still come from the rig and are not checked yet.
- Derived · 0/N checked: the camera only has its rig pose. None of its points is checked yet.
- No valid calibration: this camera can't be saved.
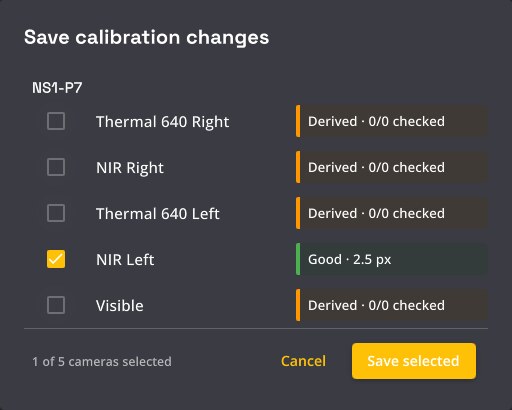
Every camera that can be saved is selected by default. Select the cameras to save and click Save selected. A message confirms where the files were written, and the page stays open.
Saving:
- applies the new calibration to the selected cameras,
- writes a backup of the device calibration (
<device>_<date>_<time>.json) and a Free Calibration session file (free_calibration_<device>_<date>_<time>.json) to yourDocuments/Kratos/Calibrationsfolder.
If you click Back (top left) with unsaved changes, Kratos asks whether to Save, Discard or Cancel.
If the device is moved after calibration, calibrate it again.
Any change in the position or orientation of a camera makes its calibration wrong. Keep the session file: re-importing it gives you all your points back.
Import a saved session
A Free Calibration session file contains your points, their placements on each camera and the resulting calibrations. Re-import it to restore a calibration, or to start again after a device was moved.
- In step 2, open the Advanced cog and choose Import free calibration....
- Pick a
free_calibration_….jsonfile (the dialog opens in yourDocuments/Kratos/Calibrationsfolder). - Select the cameras to import. Each one shows how many points it has and whether it has a calibration, or Not found if the camera is not in the show.
- Choose what to restore (all on by default):
- Restore camera extrinsics: the camera position and orientation.
- Restore 2D point placements: the markers on each camera image.
- Restore missing world points & patterns: points missing from the current show.
- Restore moved world point positions: the saved positions of points that have since moved.
- Click Import, then check the result and Save.
Tips
- Calibrate when the stage is empty, so no riser, speaker or person hides your marks.
- Cover the depth of the stage, not just the front edge.
- Calibrate one camera by hand first, then use the magic wand for the other cameras of a Kapta, and check every point it brings over.
- Keep a Control point to check the result independently.